Preparing Identification Credentials
-
Log in to the Cloud4Y object storage console:
https://cmc.objstor.cloud4u.com:8443/ -
To configure and use various utilities, you will need to obtain your Secret Key, Access Key ID, and S3 Endpoint. These can be found in the Cloudian Management Console (Fig. 1):
https://cmc.objstor.cloud4u.com:8443/Cloudian/security.htmThese parameters are located under Profile Settings → Security Credentials in the Cloudian object storage web interface.
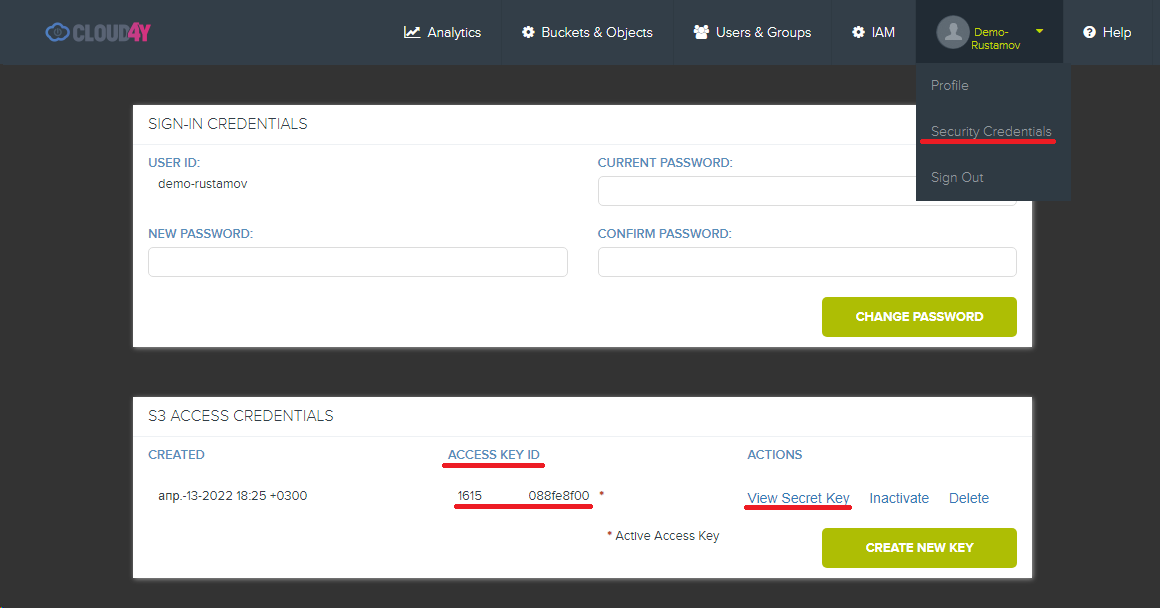
Figure 1. Cloudian Management Console - Security Credentials. On this page, you can view your Access Key ID and Secret Key. (Click "View Secret Key" to display a pop-up window with your key.)

Figure 1.1. Information in the Cloudian Management Console - Security Credentials for S3 ENDPOINT
S3 ENDPOINT (HTTP):s3.objstor.cloud4u.com:80, s3-k41.objstor.cloud4u.com:80
S3 ENDPOINT (HTTPS):s3.objstor.cloud4u.com:443, s3-k41.objstor.cloud4u.com:443
S3FS
S3FS is a program for Linux and macOS that allows you to mount Object Storage buckets via FUSE.
https://github.com/s3fs-fuse/s3fs-fuse
Note: S3FS performance depends on local disk performance. Use high-performance disks, especially if you store many small files (hundreds of kilobytes or smaller).
Installation (Ubuntu/Debian)
- To install s3fs, run the following command in the terminal:
sudo apt install s3fsConfiguration
- To configure s3fs, save your Access Key ID and Secret Key in the
~/.passwd-s3fsfile using the following format:<ACCESS KEY ID>:<SECRET KEY>
Then restrict access to the ~/.passwd-s3fs file:
echo <ACCESS KEY ID>:<SECRET KEY> > ~/.passwd-s3fs
chmod 600 ~/.passwd-s3fs
Mounting a Bucket
- Choose the directory where you want to mount the bucket and ensure you have sufficient permissions for the mount operation.
3.1. Run the following command:
s3fs <bucket_name> /mnt/<path_to_your_directory> -o passwd_file=$HOME/.passwd-s3fs -o url=http://s3.objstor.cloud4u.com -o use_path_request_style- You can configure automatic bucket mounting at system startup by adding the following line to the
/etc/fstabfile:
s3fs#<bucket_name> /mnt/<path_to_folder> fuse _netdev,allow_other,use_path_request_style,url=http://s3.objstor.cloud4u.com,passwd_file=/home/<username>/.passwd-s3fs 0 0You can now work with the object storage directly as a file system: copying, deleting, and adding files to the current bucket using standard terminal commands.
S3CMD
S3CMD is a free command-line tool for managing data stored in S3 storage. The utility is written in Python, allowing it to be used on both Windows and Linux operating systems.
https://s3tools.org/download
Installation (Ubuntu)
- To install S3CMD on Ubuntu, run the following commands in the terminal:
wget -O- -q http://s3tools.org/repo/deb-all/stable/s3tools.key | sudo apt-key add -
sudo wget -O /etc/apt/sources.list.d/s3tools.list http://s3tools.org/repo/deb-all/stable/s3tools.list
sudo apt-get update && sudo apt-get install s3cmd
Configuration
- After installing S3CMD, configure the connection settings:
s3cmd --configureAccess Key: <Enter your ACCESS KEY ID>
Secret Key: <Enter your SECRET KEY>
Default Region [US]: msk
Encryption password: <Press Enter>
Path to GPG program [/usr/bin/gpg]: <Press Enter>
Use HTTPS protocol [No]: <Press Enter>
HTTP Proxy server name: <Press Enter>- Configuration is not complete yet. Open the configuration file using nano:
nano .s3cfgModify the following parameters:
cloudfront_host = s3.objstor.cloud4u.com
host_base = s3.objstor.cloud4u.com
host_bucket = %(bucket)s.s3.objstor.cloud4u.com
simpledb_host = s3.objstor.cloud4u.com
website_endpoint = http://%(bucket)s.s3.objstor.cloud4u.com/- After modifying the configuration file, you can verify the connection to the object storage.
Example Operations
List buckets:
s3cmd lsCreate a bucket:
s3cmd mb s3://<bucket_name>List objects in a bucket:
s3cmd ls s3://<bucket_name>Download an object:
s3cmd get s3://<bucket_name>/<object_name>Delete an object:
s3cmd del s3://<bucket_name>/<object_name>Duplicati
Duplicati is a client-server backup software for Linux, macOS, and Windows, distributed under a free license. Below, we will configure backup between local storage and Cloud4Y S3 object storage on Windows.
Installation
- Download the Duplicati MSI installer for Windows (64-bit version).
1.1. Run the downloaded MSI installer and follow the on-screen instructions.
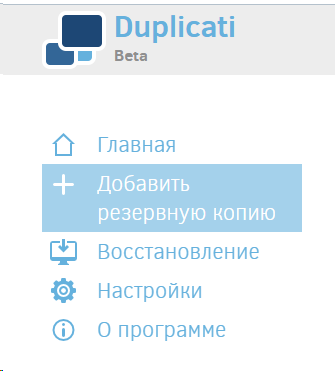
Figure 2. Duplicati Control Panel
Configuration
- After installation, the web interface will open. If it doesn't, navigate to the following URL in your web browser:
http://localhost:8200/ngax/index.html#
- In the web interface, select Add backup from the left menu (Fig. 2). A window will appear with backup creation options: select Configure a new backup.
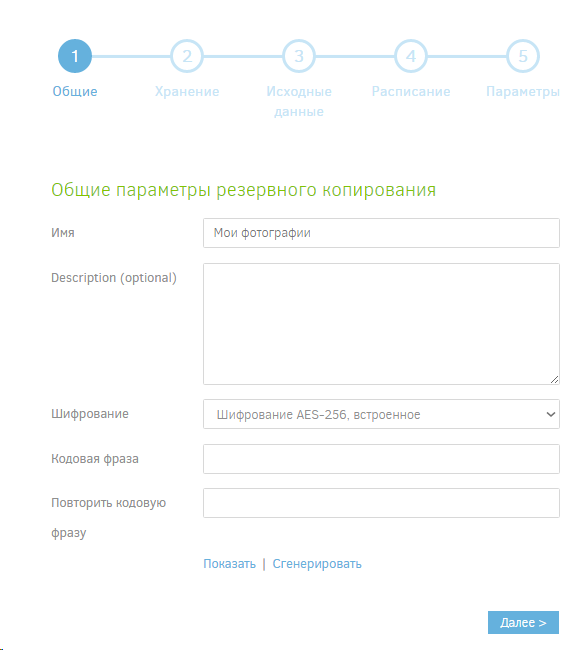
Figure 3. Backup Settings Options Window
3.1. Enter the backup process name, description, and passphrase.
- The next window is particularly important for configuring the connection:
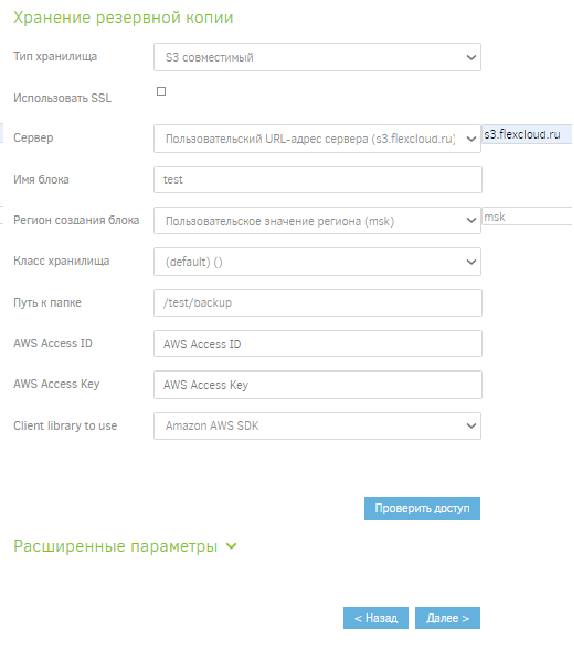
Figure 4. Backup Settings Options Window
Set the following parameters:
- Storage Type: S3 compatible
- Custom URL:
s3.objstor.cloud4u.com - Bucket name: Enter the name of the backup bucket that will be created during the backup process
- Bucket creation region: msk
- Folder path: Specify the path to the backup directory inside the bucket
- Enter your Access Key and Secret Key
-
In the next settings window, specify the local directory — what exactly you want to back up to the object storage.
-
Configure the schedule settings and backup file size parameters, as well as what to do with previous backups.
-
Once all configuration procedures are complete, your S3 storage connection will be added to the Home page (Fig. 5) for creating backups. Note that files uploaded to S3 storage have the format:
*dblock.zip.aes
(Files retain their original format on local storage when restored.)
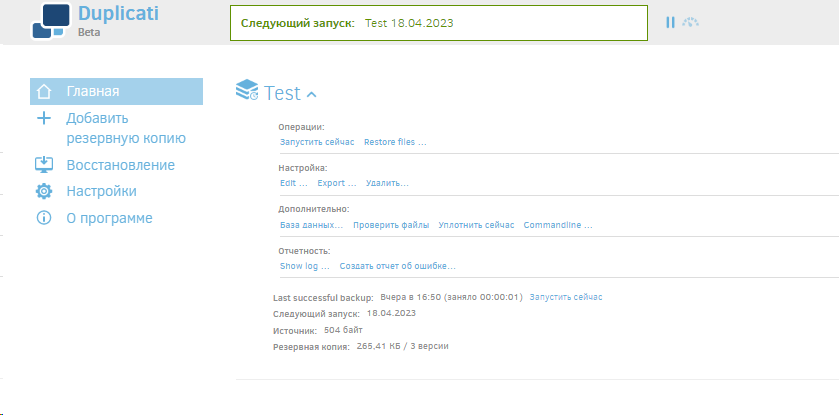
Figure 5. Duplicati Web Interface Main Menu
For more detailed information about Duplicati, visit: https://duplicati.readthedocs.io/en/latest/
Handy Backup
Handy Backup allows you to save data from a cloud account to another storage medium, as well as use the cloud as a backup storage location on Windows operating systems.
Installation
- Download the Handy Backup MSI installer for Windows (64-bit version).
1.1. Run the downloaded MSI installer and follow the on-screen instructions. After installation, the Handy Backup control panel will open (Fig. 6).
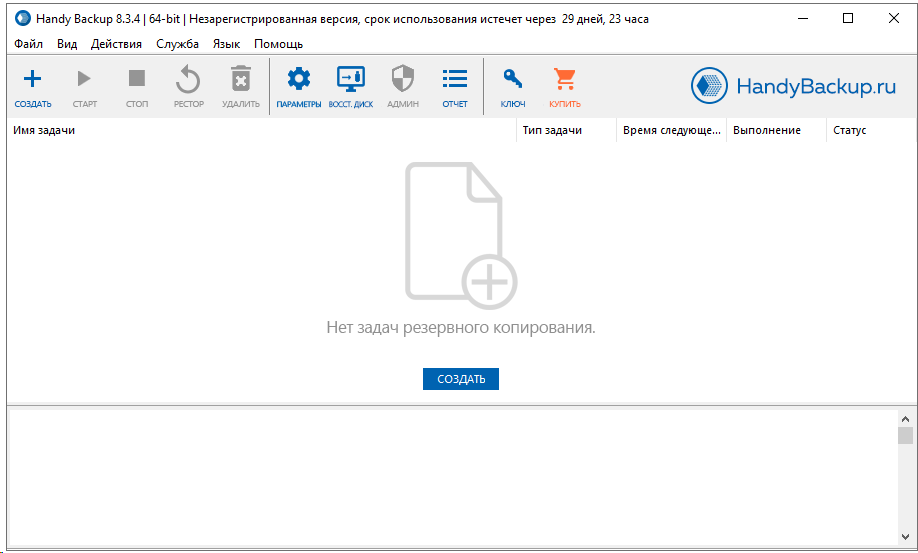
Figure 6. Handy Backup Control Panel Interface
Configuration
2.1. Click Create →
2.2. In the window that appears, select Create a backup → Next
2.3. In the next window, select what and from where to back up (local, FTP, or any other storage you need to connect): required storage (Fig. 7)
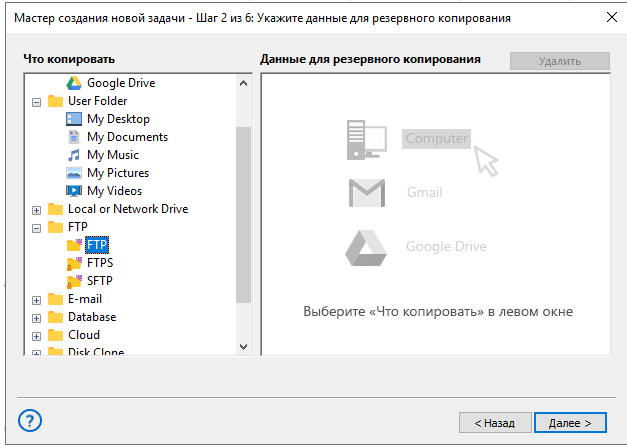
Figure 7. Configuring Object Storage Connection and Data Backup.
Selecting Objects for Backup.
2.4. Click Next → In the next window, configure the connection to Cloud4Y S3 object storage:
Click S3 Cloud, then click Create Connection in the window that appears → In the connection settings window, enter the familiar: Access Key, Secret Key, and Endpoint. (Fig. 8, 8.1)
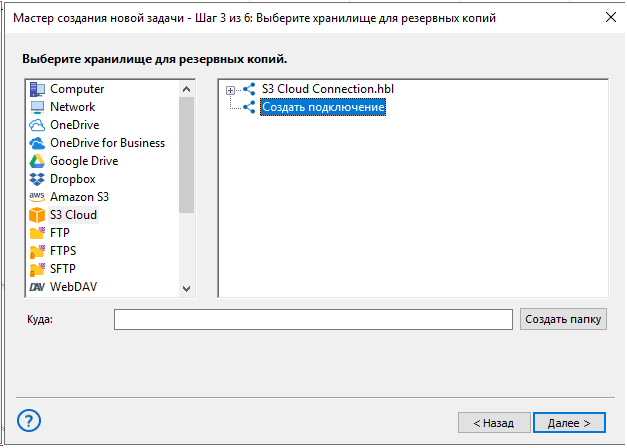
Figures 8, 8.1. Configuring Object Storage Connection and Data Backup.
Selecting Storage for Backups.
2.5. Click Next → In the following windows, you can set compression and encryption parameters, as well as configure the backup schedule.
2.6. A scheduled backup task between storages will be created. Additionally, you can manually start the process at any time if an urgent backup is needed (Fig. 9).
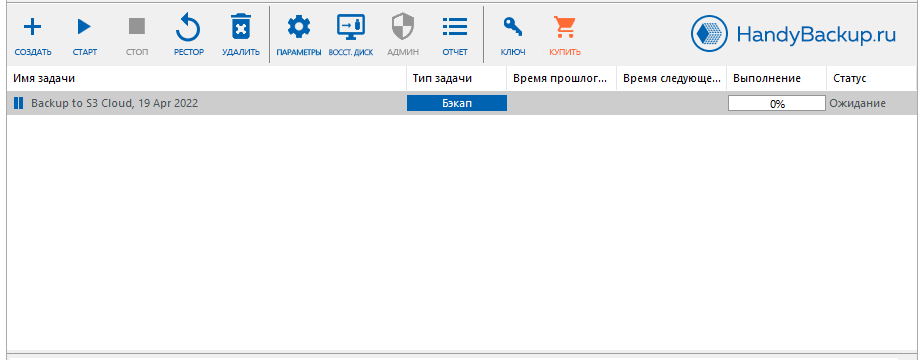
Figure 9. Interface for Managing Backup Between Storages.
For more detailed information about the program's features and capabilities, visit: User Guide
S3 Browser
S3 Browser is a free Windows client for Amazon S3 and Amazon CloudFront. S3 provides a simple web services interface that can be used to store and retrieve any amount of data at any time.
A user-friendly GUI client for working with S3 storage on Windows.
Installation
- Download the S3Browser MSI installer for Windows.
1.1. Run the downloaded MSI installer and follow the on-screen instructions.
- After launching S3Browser, configure the connection to the object storage (Fig. 10).
2.1. Click Accounts → Add new account (Ctrl+Shift+N), using your previously obtained Secret Key, Access Key ID, and Endpoint (in this case, REST Endpoint: s3.objstor.cloud4u.com).
Change Account Type to: S3 Compatible Storage

Figure 10. Adding a New Connection in S3Browser
2.2. Click Advanced S3-compatible storage settings — in the window that appears, specify the region: msk (Fig. 11)
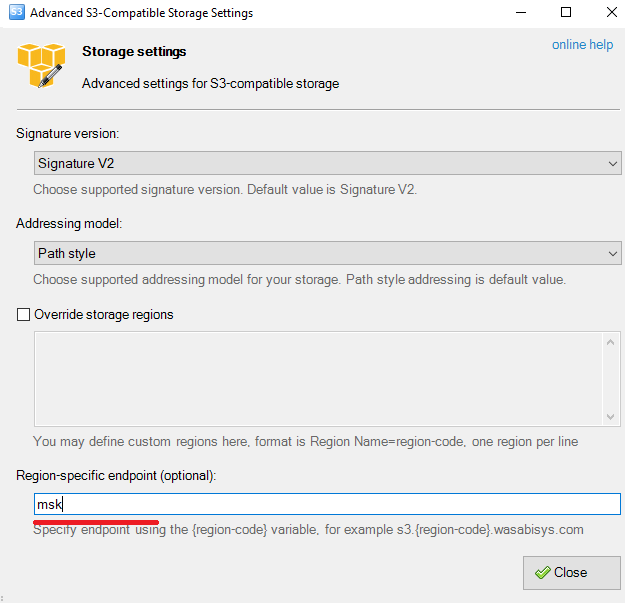
Figure 11. Advanced S3-Compatible Storage Settings
-
Click Add new account.
-
After adding, the connection will be established automatically, and your existing buckets, directories, and files will be displayed (Fig. 12).
You can create, delete, modify, assign access policies, and create user accounts from this window.
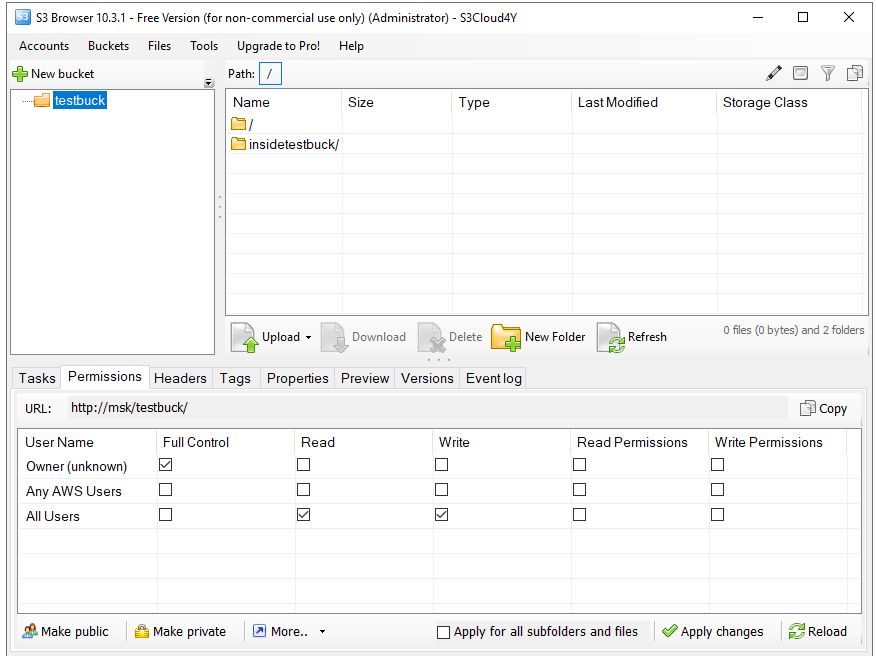
Figure 12. S3 Browser Interface for Managing Object Storage.
Have you tried Cloud4U services? Not yet?
