A file system can be corrupted due to various malfunctions or sudden shutdown of the computer. During a normal shutdown, all file systems are mounted read-only and all unsaved data is recorded on the disc. But if the power is switched off unexpectedly, some data is lost. Consequently, important data can be lost, resulting in damage of the file system itself.
One problem can be temporary unavailability of the storage system (SSD). Linux virtual machines (VMs) are very sensitive to such events, switching to Read Only.
In this article, we will look at the options to resolve this issue:
The first and the easiest way is to reboot the Virtual Machine
To reboot a virtual machine do the following:
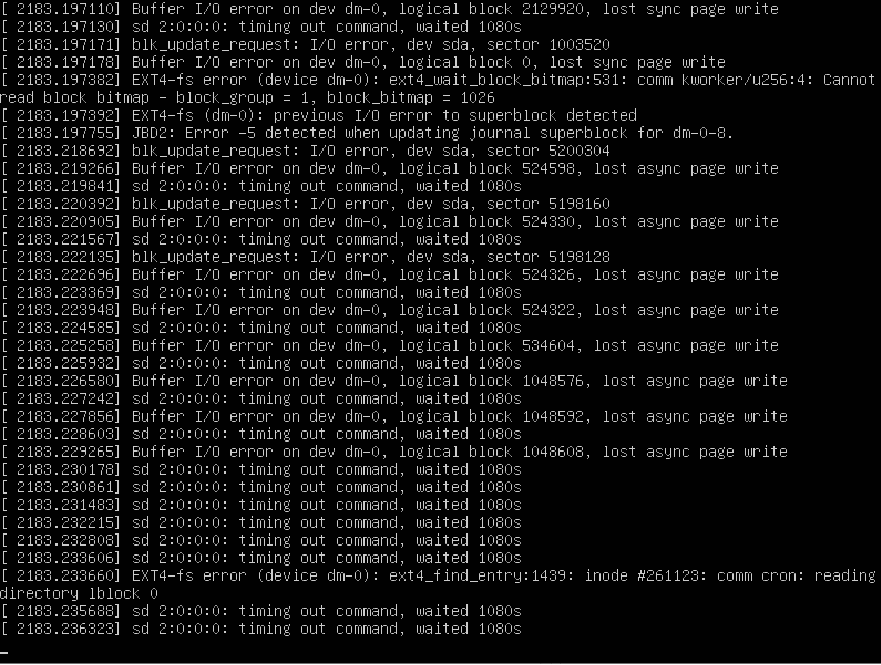
- Left click on the Virtual Machines section in the left area of the vCloud Director interface. (Figure 1. action 1)
- Find the virtual machine you need in the main area of the interface. (Figure 1. action 2)
- Left-click the Actions drop-down menu below the virtual machine description. (fig. 1. action 3)
- From the drop-down list, select the Reset option and left-click it. (fig. 1. action 4)
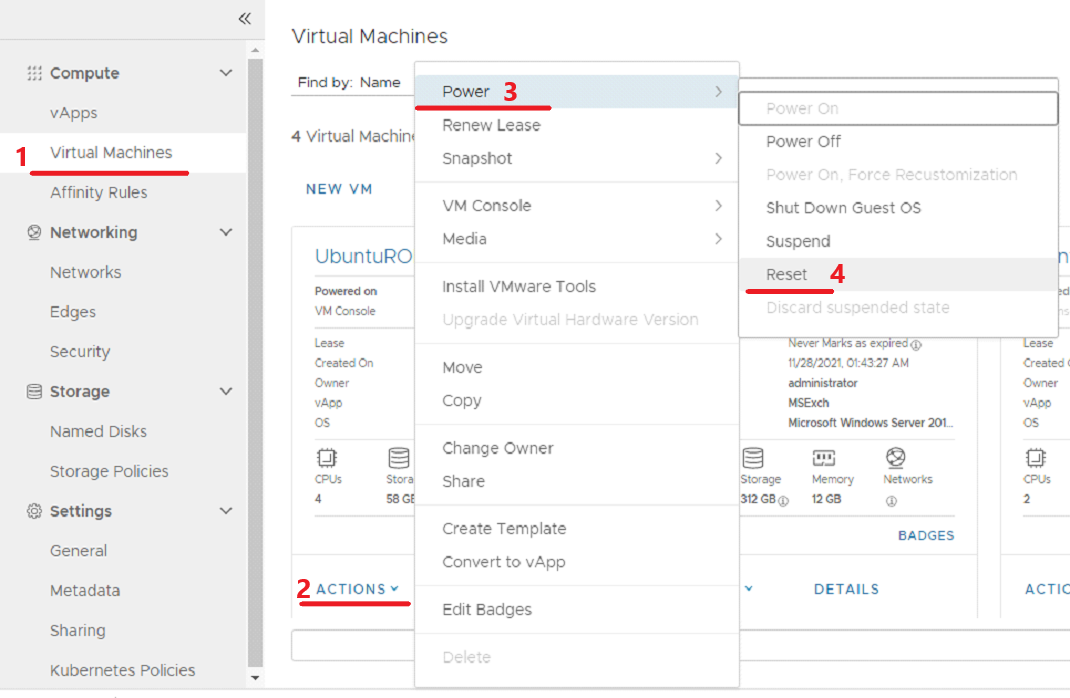
Figure 1: VMware Cloud Director - Virtual Machines, rebooting the virtual machine.
In the second case, Linux is not booted, only initramfs command line is available to the user
Figure 2: Command line with initramfs
*Initramfs is an initial file system in RAM based on tmpfs that does not use a separate block device. Like initrd, it contains the utilities and scripts required to mount filesystems before calling init, which resides on the root filesystem..
If you don't see such an error, try typing exit in a terminal window. The error may appear after that:
(initramfs) exit
The error specifies a volume (in our case sda1) that requires you to run a manual disk check. At the initramfs command line, run:
fsck /dev/sda1 –y
You can also use the -A flag to check all file systems attached to the computer:
fsck -A –y /dev/sda1
After a complete check, you should restart the system.
If the system does not change to initramfs, it is necessary to boot from LiveCD
In this case, you need to mount the LiveCD iso image to the virtual machine.
Do the following:
- Left-click on the Virtual Machines section in the left area of the vCloud Director interface. (Figure 3. action 1).
- Find the VM you need in the main interface area.
- Left-click the Actions drop-down menu below the VM description. (Figure 3. action 2)
- In the drop-down list, select the Media option and left-click on it. (fig. 3. action 3)
- In the drop-down list, select the Insert Media option (Fig. 3. step 4).
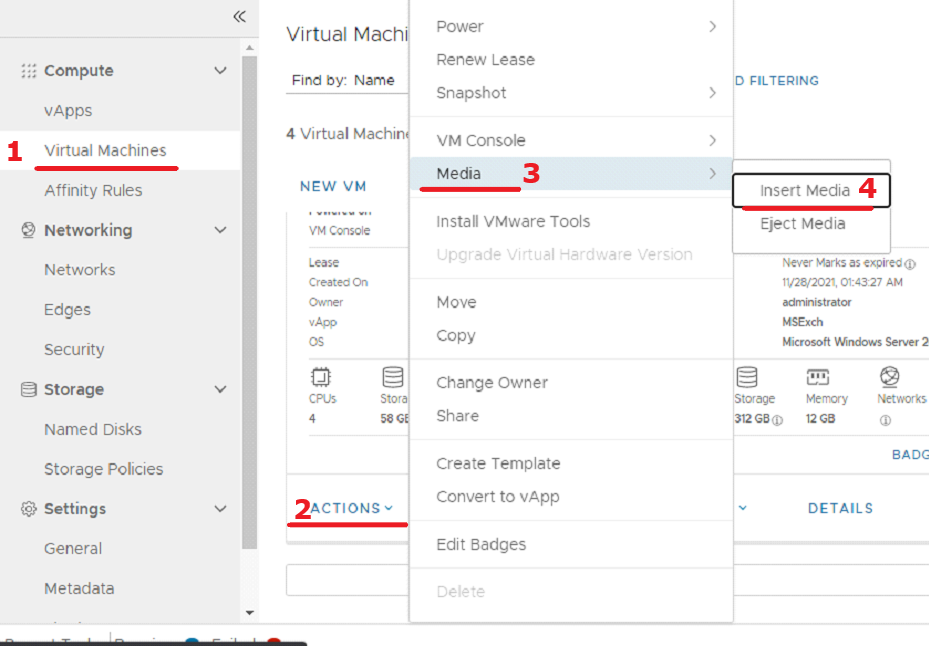
Figure 3: VMware Cloud Director - Virtual Machines, mounting the ISO image.
In the appeared window, select the LiveCD image that you need to preload into your directory. We use gparted-live as an example (Figure 4 action 1), but you can use any other. After selecting the iso-image, click insert (Fig. 4 step 2)
Figure 4: Selecting the LiveCD ISO image: gparted-live
Next, switch to booting from CD in the BIOS settings. To do this, go to the virtual machine menu. Click on its name to get to this menu (number one in Fig. 5 is the name of your VM).
Select Edit in General (on the right) (Fig.5 actions 2 and 3 respectively).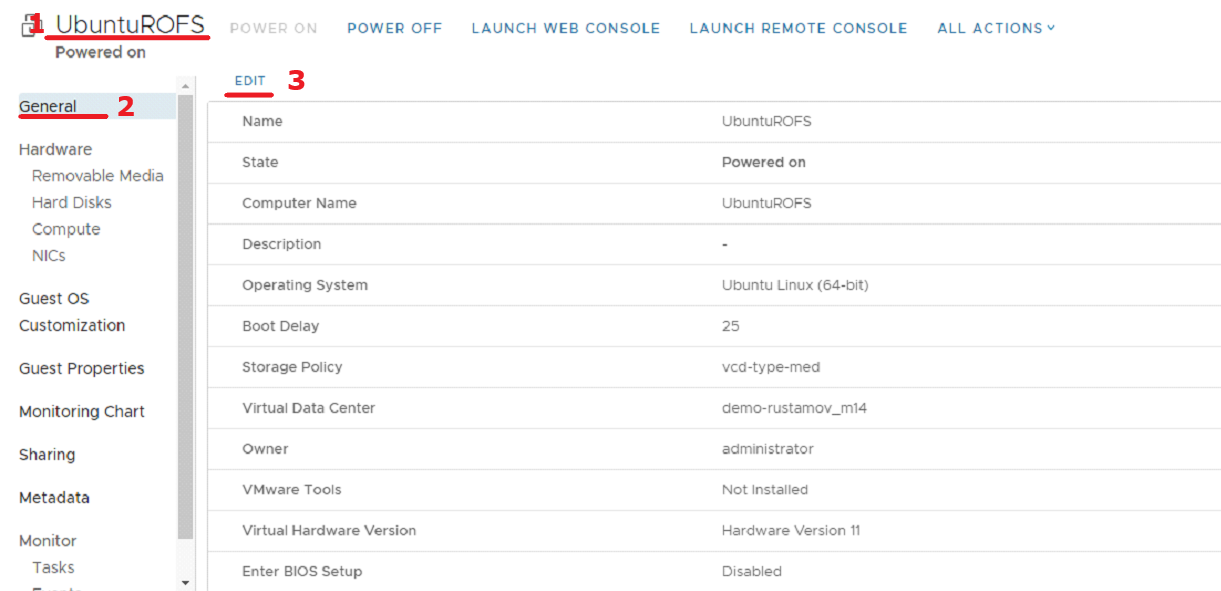
Figure 5: Virtual machine menu
In the appeared window, it is necessary to set the Boot Delay value from 5 (the boot delay required to press the key to get into the BIOS). Set the Enter BIOS setup switch to on. Press Save. (Figure 6, steps 1-3 respectively)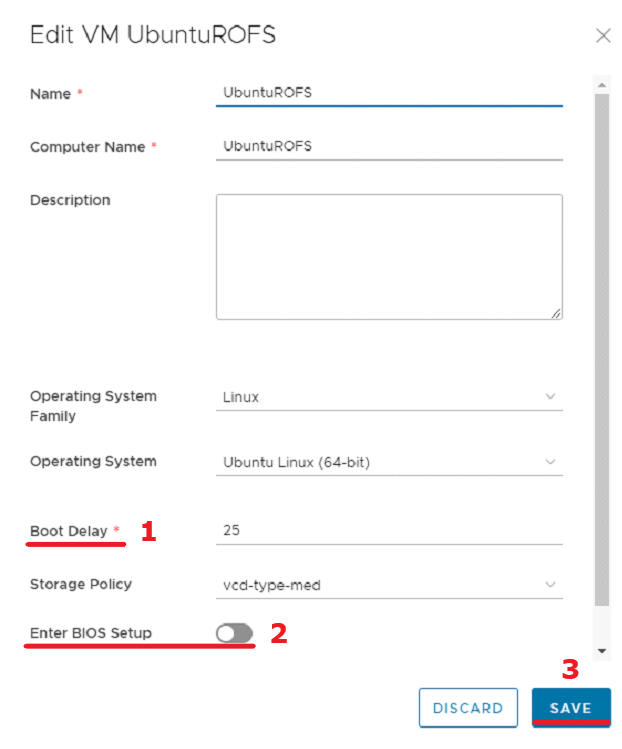
Figure 6: Settings for the General parameter
After starting the machine via Power on, Force Recustomization, wait for the VM to boot and open VM console to get to the BIOS window. (Figure 7 action 1-2)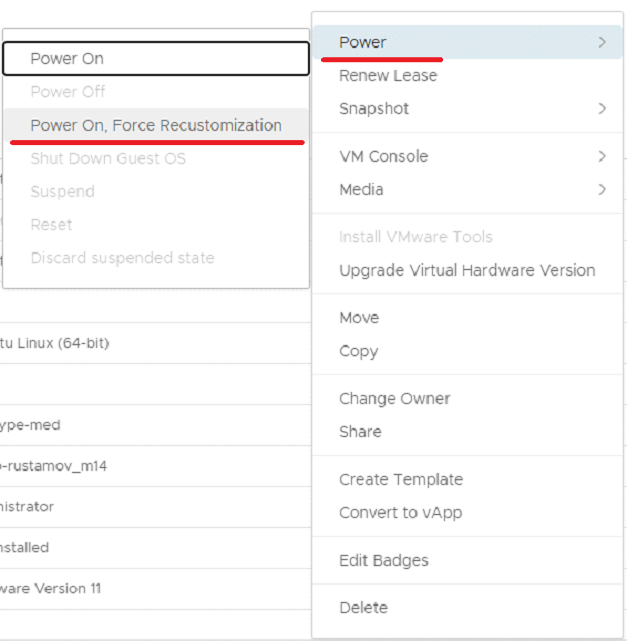
Figure 7. Switching on the virtual machine using the modified settings
On the Boot tab, "move" the CD-ROM value to the highest position. Select it and press + on the keyboard repeatedly until the CD-ROM is in the first position. This will allow the system to boot from the mounted image (gparted-live) (Fig.8)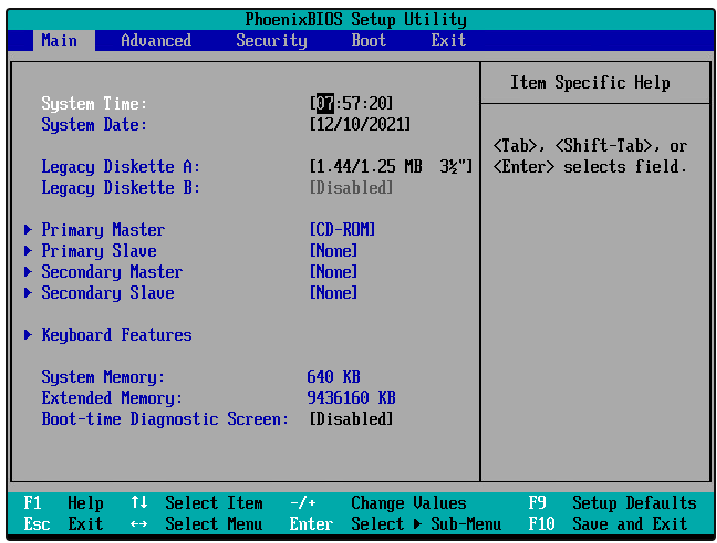
Figure 8. BIOS menu of the virtual machine.
Go to the Exit tab and select Save and exit.
The virtual machine will boot from the image. In the appeared window, select the first item and press Enter.
Select Don't touch keymap and press Enter. (Fig. 9).

Figure 9. Starting gparted-live
Type 24 - Russian, then Enter
Next enter 0 and then Enter again.
The system has booted. The Gparted utility window will open automatically. Close it and open terminal. (Fig. 10)
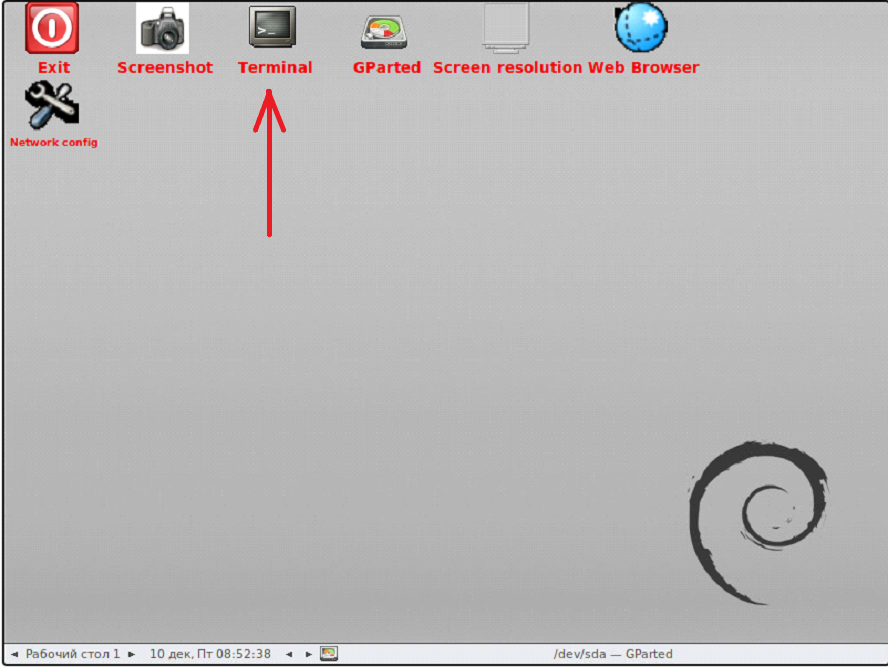
Figure 10. Launching the terminal
In the terminal window that appears, enter the command:
sudo fsck -y -f -c /dev/sda1
If you see an error, you should probably unmount this partition:
sudo umount /dev/sda1
Keys and parameters of the fsck command:
y - always answer yes to all questions (there is an alternative: key p - starts checking in fully automatic mode);
f - force file system check (even if the file system is marked as fully functional)
c - look for bad blocks and mark them accordingly/dev/sda1 - device or partition to be checked.
The output of the terminal after verification in our case:
ubuntu@ubuntu:~$ sudo fsck -y -f -c /dev/sda1fsck from util-linux 2.20.1e2fsck 1.42.5 (29-Jul-2012)
Checking for bad blocks (read-only test): 0.00% done, 0:00 elapsed.
(0/0/0 errdone/dev/sda1: Updating bad block inode.
Pass 1:Checking inodes, blocks, and sizes
Pass 2: Checking directory structure
Pass 3: Checking directory connectivity
Pass 4: Checking reference counts
Pass 5: Checking group summary information/dev/sda1:
***** FILE SYSTEM WAS MODIFIED *****/dev/sda1: 372991/1921360 files (0.2% non-contiguous), 2539924/7680000 blocks
***** FILE SYSTEM WAS MODIFIED *****
This system message indicates that the current file system was modified by the fsck program.
After all operations, you need to reboot and unmount the image from the virtual machine. To do this, click Eject media (Fig.11 action 1-4).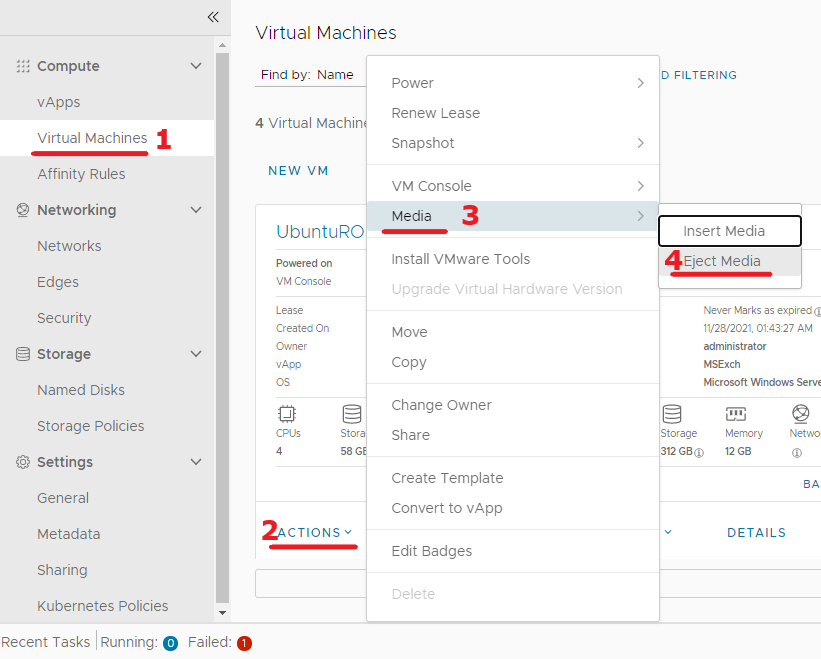
Figure 11. Unmounting a LiveCD image from a virtual machine
If you have difficulties at step 18, follow these instructions - check the disc partitioning with the command: > lsblk
Example output of the command: 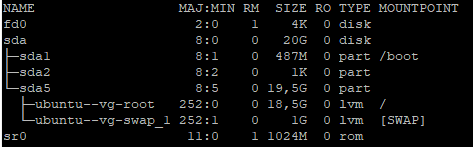
From the output of the command, we see that the LVM is named ubuntu--vg-root, but we can't run fsck on this name, because the command won't find it. We need to get the full name, for this we need to run the lvm lvscan command to get the LV name with which we can run fsck on the LVM.
sudo lvscan
Example output of the command:![]()
the name of the drive you want to check for errors is /dev/ubuntu-vg/root, it should be suitable for running fsck on this name.
If /dev/ubuntu-vg/root is not ACTIVE, we need to make it active using the command:
sudo lvchange -ay /dev/ubuntu-vg/root
Run force check with automatic error correction fsck to check the LVM volume:
sudo fsck -fy /dev/ubuntu-vg/root
After all operations reboot
sudo reboot -f
And unmount the image from the virtual machine. To do this, click Eject media (Fig.11 action 1-4).
Have you tested Cloud4Y Cloud Hosting? Not yet?
Submit your application now and get 14 days free access.
СМОТРЕТЬ ПОДРОБНОСТИ ПОПРОБОВАТЬ БЕСПЛАТНО
